Thursday, January 21, 2016

MFT Missing You Card

Hi all!

I'm back with another card video today. I'm sharing one of the cards I made for my Card Sets that I gave to friends and family at Christmas. This one was inspired by the MFT Design Team Member Karin Akesdotter. You can see her original blog post here. I saw her card and fell in love with the beautiful softness of it, but wanted more flower colors. I was looking to make another missing you card and thought this one would be perfect!


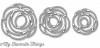
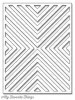
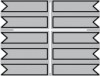
I have loved the MFT Four Way Chevron cover plate since it came out, but I just never ordered it. My friend Betsy knew how much I wanted it, and got it for me for Christmas!! Yay!! I instantly pulled it out and started playing with it that night after finding Karin's card :)


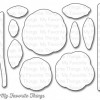
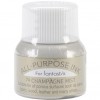
The flowers were colored using my distress inks and mini blending tools. I used Mermaid Lagoon and Peacock Feathers for the blue flower, Tattered Rose and Worn Lipstick for the pink, Shaded Lilac for the purple, and Twisted Citron and Mowed Lawn for the leaves. I sprayed them with some Tsukineko 0.5-Fluid-Ounce All Purpose Ink, Champagne Mist which I have found at Amazon if you would like to get your hands on it!!!! I'm going to need to stock up on this and maybe try some other colors!!! This stuff is fabulous! You can see the beautiful shine on this picture!


 Because I used my mini blending tools to create some colored areas with distress inks, every flower that I cut out came out different! I just love how you can see the different tones in all the flowers, especially in this picture.


 Anyway, I cut my blended flowers out using the MFT Scribble Roses die. I then took some Stick It paper, placed it on the back of some Stamper's Select White, and cut out the MFT Scribble Roses Overlay die so they would already be backed with adhesive. 

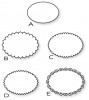
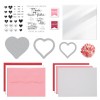
I used the Papertrey Ink Limitless Layers 2 1/4 inch ovals die to create a place to put my sentiment. I stamped the "miss you" from MFT's Written in Watercolor using Versafine Onyx Black Ink. 

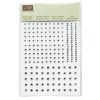
After I placed a vellum layer behind my cover plate, and popping it up with some foam adhesive, I used dimensionals to pop up my flowers and my sentiment. I added some bling using Stampin' Up Jewels and some enamel dots from My Style Stamps and Freckled Fawn. I placed the whole thing on a Fresh Snow Linen Cardstock base.

On the inside, I used the Papertrey Ink Tucked in: Thinking of You stamp set to stamp a sentiment in Altenew's Lavender Fields.


That's my finished card! I hope you guys enjoy, and I'll be back again soon with a quick tip for the Papertrey Ink Moment's Inked Planner :)


Saturday, January 16, 2016

My Monthly Hero Heart Shaker Card

Hi all,

I'm back with a card and video today. The other day I showed you the new My Monthly Hero kit from Hero Arts that I absolutely love!!! Then I showed you some cards I made using the kit. I told you I'd be back later in the week with a video on how to make one of the cards, and here it is. I decided to start with the heart shaker because I wanted to show you how the dies work and how I made the background.


I started this card by rubbing  my inks across a clear acetate piece and then misting them. These inks don't react well with water, but I was still able to get a pretty cool effect from doing this. I toned it down using the included vellum and I love how it just makes a loud background look so soft :)

Next I created the heart shaker part. For my first card, I only went with one layer of foam, but it doesn't shake very well, so in the video I decided to use 2 layers, and it shakes so much better!!! I ran the shimmer white piece through with the scallop heart die and the inside heart die. Then I traced around the outside of the die on foam, acetate, and Blushing Bride cardstock from Stampin' Up. I put the foam pieces on the vellum and filed it with goodies from the sequin mix included in the kit. Then I covered it with the acetate and heart piece.


I wrapped some old Stampin' Up ribbon around the card layer, then glued it to the card base (the pink card that came in the kit). I stamped a saying from the included stamp set as well and that's it! I love how fun and cute this card turned out!


I'm not sure who I'll give this to, but I had fun playing around with my kit and making this card.


Here's the video :)


Thanks for stopping by and I'll see you back here soon!


Tuesday, January 12, 2016

Week 8 Planner Layout Process

Hi all!!

I'm back today with another project. This time it's a planner layout. As I told you in my last planner post, I am completely obsessed with my new Moment's Inked Planner from Papertrey Ink. IN LOVE!! I just open it and look at it after school when I get home... and embrace all the prettiness :)

So.. I've already decorated all the weeks in January. I really wanted to keep doing stuff in my planner, so I decide to get a jumpstart on February! I don't know what I want to do for the first 2 weeks, but I thought about it and realized that the week with Valentine's Day would be an easy week to decorate. I mean, of course I was going to decorate it for Valentine's Day, so I didn't have to think too hard about what I wanted to do.


I knew I wanted to use my new Papertrey Ink stamps and dies from the December release, including the Be Mine, Valentine and XOXO. I didn't end up using the Be Mine, Valentine stamp very much, but I did use XOXO for most of the layout.

I came up with a little bit of a plan, but wasn't sure what the whole page would look like. I decided to film it in case anyone was interested in seeing how I came up with my layout.


I already had die cut the TV from Polka Dot Parade #3 and write Walking Dead on it because it comes back on Valentine's Day, so that was already part of my layout. The rest of the layout was done on camera.

I knew I wanted to cut out "Be Mine" and "Valentine" from the XOXO die set, and was hoping I could find some kind of heart cluster stamp in my stash, almost like the confetti stamp from PTI, but with hearts. Alas... I could not find one :( But as I was looking through my stash, I came upon my Quilled Elegance stamp set. This stamp was looking a little dusty and unloved! But I saw the heart border stamp set and thought it would be a perfect place to house my die cut words!!! I pulled it out and they fit! Perfect! I inked the big border stamp with Raspberry Fizz and Pure Poppy to get a sort of gradient look, then glued the due cut words inside the borders.


Next I pulled out the XOXO stamp set and played around with the hearts, trying to decide which ones I wanted, which colors, and where. I finally settled on the left side of my planner using Lovely Lady, Autumn Rose, and Scarlet Jewel. I used one of the small open heart stamps from the same stamp across the top of the left page in Lovely Lady, Hibiscus Burst, and Pure Poppy.

I used the leftover heart die cuts from this card here to place around the page. I also found some heart washi in my stash from Michael's that looked perfect going across the top of the page. I just love those pattern hearts!

Next I pulled out some different love sentiment stamp sets to see which one would fit and which one I would like. I settled on the I heart you to infinity and beyond from Sending My Love.

Lastly, I wanted my Valentine's Day column to say A heart A because that's what our wedding Save the Dates said. I tried both Wet Paint Alphabet Upper and Lower dies before I settled on the Upper Alphabet. I tried cutting out the small heart from XOXO, but decided it was too big. So I looked all around my room, in all my stamps, and then finally realized that Shakers & Sprinkles Heart Dies had a die set that was meant to make small confetti hearts. I pulled it out and realized it was a perfect size! I cut it out of Pure Poppy and placed it with my A & A. I sprinkled some more hearts throughout the layout and then called it done.


I hope you guys enjoyed this process vide. Let me know if you'd like to see more :)